How to Enter Charges
If you have not already done so, please read Patient Check Out Overview, Printing the Encounter Form,and Completing Visit Activities Overview before proceeding with this topic.
Summary
The goal of this step is to make sure that all activities performed on the visit have been entered on the visit record and are available to be billed. If you have selected charges from a protocol when you printed the Encounter Form, then all you need to do is confirm the services were rendered by marking the activities Complete. If activities were performed which were not selected in advance, as will be the case with injury related visits, then they need to be added. If activities selected in advance were not performed then they need to be marked as Cancelled or Refused, and the reason documented.
Completing charges is distinct from entering clinical results. Once an activity on a visit is marked as Complete it is available to be billed, even if there is medical information to be entered later. For instance, the lab result for a titer might not be available until 2-3 days after the draw. The activity can be marked Complete on the day of the visit and billed the next day. When the lab result arrives, it can then be entered on the activity. To learn more about entering medical information on an activity, please read Clinical Results Overview.
Billing Instructions
The software is designed to relieve clinic staff from as much of the burden of billing as possible. Almost all billing instructions are determined when the program is set up and require no work at the time of the visit. However, occasional exceptions are inevitable, and they must be handled in the clinic. These exceptions include the entry of a special one-time price, marking an activity as non-billable, receiving payment from a party other than the default payer, or entering a billing modifier.
Fee Ticket / Super Bill
An option is available to allow activity for Workers' Comp, Urgent Care, and Private Practice visits to be entered from a fee ticket. Both methods are discussed below. Please read How to Set Up a Fee_Ticket / Super_Bill to learn about enabling this option.
Correcting Billing Errors
Certain errors, if found after charges are processed, must be corrected in the visit record. One possible error is finding that an activity or CPT code has an incorrect fee. It is not enough to simply correct the fee in the appropriate fee schedule. the program determines the correct fee and adds it to the medical activity on the visit either when charges are processed or when the Calc Charges button is clicked on the visit record. If either of these events has occurred, the medical activity must be deleted from the visit and re-entered. This can even be true if charges have not been processed.
What Do You Want to Do?
-
View the [Visit Charges and Results] window
-
Enter / complete charges
Starting on the [Enter Visit] window, click the Charges button. Then:
For activities already selected from a protocol:
-
On the [Visit Charges and Results] window, click the Complete All Activities button. The status of all billable items will change from Requested to Completed. The status of non-billable items will change to No Charge.
To add additional activities:
-
If you know the CPT code or the medical activity code, enter it in the Quick Entry field at the top of the screen, then press the tab key. The activity will appear on the list of [Visit Activities], already marked as Complete (you would not be selecting it if it were not complete, so we can save you a step.)
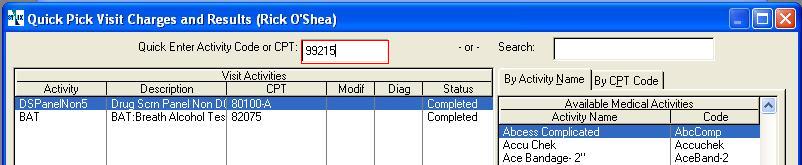
Make sure your fee ticket has the CPT codes as they are entered in the program, complete with Code Modifier AN extension to CPT codes to make the codes unique for different activities which share the same CPT code. These ususally consist of a dash and one or two letters: -A, -B or -AA, -AB, etc. . You will save a lot of time not having to search for activities. See CPT Code Setup
We also recommend you memorize the codes you use most often, as it is much easier to type in the code than to use the list! You can change medical activity codes to make them easier to memorize, without affecting your data.
-
If you do not know the CPT code or the medical activity code, search the list in the right pane of the [Visit Charges and Results] window by entering the first few letters of a description of the activity description in the Search field and pressing the tab key on your keyboard. Since there are different ways to describe some activities (ex. TST vs TB Test; Flu vs Influenza), you might need to try more than once.
Alternatively, click the CPT tab at the top of the pane to display items in CPT code order. You can search by entering all or part of the CPT code in the Search field and pressing the tab key.
When you find the activity, highlight it and click the Select button or double-click it. The activity will be added to the left pane with a status of Complete.
If an activity selected in advance is not performed:
-
Double-click the activity.
-
On the GENERAL tab of the [Enter Activity Charge] window, change the Billing Status to Refused or Cancelled. You always want to do this instead of simply deleting an activity so that you have a record of the fact that the activity was originally ordered, but then not performed for a reason.
-
Click the RESULTS tab.
-
In the Summary field, enter the reason the activity was not performed (ex. Pregnant, declined TB skin test.)
-
Click OK to save.
-
-
Enter charges from a fee ticket for Urgent Care, Workers' Comp, or Private Practice visits
Starting on the [Enter Visit] window, click the Charges button to see the window for entering charges from a fee ticket:
-
Find the first activity you want to select. If you don't see it, in the upper right of the screen use the Prev and Next buttons to find the page which has it.
-
Double click the line for the activity you want. This will enter "1.0" in the box to the right of the CPT code.
-
If the item has a different quantity, you can edit the number.
-
Repeat steps a - c for all activities.
-
Optionally, you can enter a CPT code in the Quick Enter Additional Activity Code or CPT box, then press the TAB key,
-
If you cannot find an activity, and are unsure about the CPT code, in the bottom right click the Review All Charges button. This will display the standard charge entry screen discussed above in the Enter/Complete Charges section of this help topic.
-
Click Close when done to return to the [Enter Visit] window.
-
-
Enter billing exceptions
Properly speaking, in the clinic you don't, for the most part, enter charges. What you do is indicate the activities performed on the visit. the program does the work of determining the payer and assigning the fee. The only time you will need to enter actual billing information will be for exceptions, such as when you receive payment at the time of the visit, when an activity must be marked no charge, when a patient pays for a company physical, etc.
The following billing exceptions can be entered on the GENERAL tab of the [Enter Activity Charge] window
-
Override Payer: An example of this would be an activity performed on a company physical that the patient will pay for. Click the drop-down arrow beside Override payer and select the payer for this activity.

This overrides the payer for this activity only. An override payer for the entire visit can be entered on the BILLING / PAYMENT tab of the[Enter Visit] window.
-
Override Fee. If there is a one-time special fee for this activity, on this visit, enter it in the Override Charge field.
-
No Charge Activity. To mark an activity as unbillable for this visit only, in theBillable Statusbox, select theNo Charge Activityradio button.
-
Billing Modifier. This option is used when there is a CPT code billing modifier to be entered which indicates a specific type of situation to the insurance carrier, such as an activity normally provided by a physician which was provided this time by a non-physician. On the GENERAL tab of the [Enter Activity Charge] window, enter the modifier in the Billing Modifier field. You do not need to put a dot in front of it, that is, enter "25", not ".25".

-
Select Diagnoses: On an injury visit, there can be multiple diagnoses, but an particular charge might be related to only one of them. If there is more than one diagnosis on the visit, the Select Diagnoses section will appear listing them. You can check the one applicable to this activity. For instance, the screen shot above shows a Laceration Repair activity. There are two diagnoses. One is for a laceration but the other is for a sprained elbow. This activity has the first one checked. Note that if an activity applies to all diagnoses, you can just not check anything. You don't have to check them all in that circumstance.
-
Billing Comment (Employer Services only): On Employer Services visits, there is a text entry box titled Billing Comment at the bottom of this tab. A comment entered here will print on the Employer Service invoice immediately after the line item charge for this activity.
-
NDC Code:This field only appears for activities set up with an Activity Type of Vaccine/Medication. See the section NDC Codes below to learn more.
Entering payment at the time of the visit is discussed in Recording a visit payment or co-payment.
-
-
NDC Codes
For medications dispensed in house or from a hospital pharmacy, physicians or pharmacists will often substitute equivalent products, depending upon the current costs. This happens on the fly and without prior notification, and clinic users are informed after the fact. Different products have different NDC codes. Currently the program will use the NDC code that is set up in the CPT/HCPCS record associated with the medical activity, if one has been entered. Users need a way to specify the NDC at charge entry time.
It might also be necessary to enter an NDC code "on-the-fly" at the time of the visit. That is the purpose of the NDC Code field on this window. An NDC code so entered will be used for the billing instead of the NDC Code defined on the CPT Code entered in the CPT Code record. Entering an NDC code here will not change the CPT Code record.
The Visit Reconciliation Report prints override NDC Codes for verification purposes.
The NDC Code can also be captured on the billing charges record after Charge Processing. This allows the entry of an override NDC code for charges that have already been processed to billing when the override code was missed at the time the medical activity was entered.